Thorp Air Command - T18.net

Supporting Owners, Builders and Pilots of the Thorp T-18 and its variants.
It is currently Sat Dec 21, 2024 10:35 am

All times are UTC - 6 hours [ DST ]


Post new topic Reply to topic  [ 28 posts ]  Go to page Previous  1, 2
Author Message
Andrew
 Post subject: Re: Plans 491 Build
PostPosted: Sun Jan 15, 2023 10:16 pm 
Newbie
Newbie

Joined: Sun May 15, 2022 8:28 pm
Posts: 38
At the end of the last session, I realized that we had a couple of rivet holes blocked by the elevator trim arms, so we unbolted the pillow blocks and rotated the arms out of the way long enough to install blind rivets and then bolted it all back together. (With everything else locked in place, solid rivets weren’t an option anymore.) As part of this morning’s session with the youth build, I showed the kids how to use the rivet squeezer and had them rivet the two angles onto the bottom of the baggage compartment tunnel. First they had to cleco it all together and take the existing holes from 1/8” to #30 so that the rivets would go in. They did a good job, and after they were done, we did a quick assembly with the u-nuts on the lid to see how it all looked. After that I had two of them use a rivet puller to install cherry rivets into the bottom of the controls tunnel between the seats. While those two were working, I worked with two others to finish installing the RH elevator bracket with the rivet squeezer. Again, we needed to first clean the holes to #30 from 1/8” which was a bit tight with the bracket already in place. It was a team effort. After the kids had left, I installed more solid rivets, including the ones inside the elevator pivot arms that needed a thin bucking bar.

For my home efforts, I've continued with putting a stiffening flange around the baggage cutout in the turtledeck.

Image

Image

Image


Top
 Profile  
 
Andrew
 Post subject: Re: Plans 491 Build
PostPosted: Sat Jan 28, 2023 11:40 pm 
Newbie
Newbie

Joined: Sun May 15, 2022 8:28 pm
Posts: 38
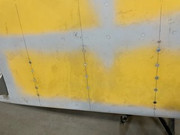
I received new wingtips from James, and they do look nice. Took the new wingtips to the build hangar this morning and fitted one of them up to one of the outer wings. Another mentor, myself, and the kids then spent time discussing how to mount them, screws vs piano hinge, and also fitted up an aileron to see where the wingtip would need to be trimmed for clearance. We then got into driving rivets and the kids took turns inside the fuselage holding the bucking bar while I drove the rivets that hold the seat supports in place. They did a fine job. Two rivets had to be drilled out and replaced, but that was more nature of the beast territory and not their fault. After the build session was over, I stayed and installed more fuselage rivets before I left. Progress!

I'd post some more pics, but just realized all I have is some photos where I used the phone to inspect some rivets (before I thought to send one of the kids for a mirror....) and a rather pedestrian pic of the installed rivets.

By the way, is that yellow a primer that one of the sheet metal vendors used to use? It is on the inside and the outside of the fuselage, and looks very evenly applied, moreso than the average builder with a spray gun.
Image


Top
 Profile  
 
Andrew
 Post subject: Re: Plans 491 Build
PostPosted: Fri Mar 10, 2023 11:04 pm 
Newbie
Newbie

Joined: Sun May 15, 2022 8:28 pm
Posts: 38
Life has interfered with airplane building for the first part of February (things like the wedding anniversary take precedent. I also completed a half-marathon at the most expensive happiest place on earth).

But I did get out to the hangar last weekend when there wasn't a build session so that I could (try to) get some rivets bucked without disrupting all the other build sessions that are usually going on. I now see how an open hangar door attracts people who want to socialize, and in our case also parents being shown what the Youth Builds are about. But I finally was able to buck rivets and the main thing to notice from the photo is what you don't see: clecoes. Other than a few rivets on the bottom of the fuselage (where my arms weren't long enough), the fuselage is now all riveted until such time as we put the top skins on. Progress!

I'll also be fitting the engine mount that Cubes sent. Looking forward to that.


Image


Top
 Profile  
 
James Grahn
 Post subject: Re: Plans 491 Build
PostPosted: Sat Mar 11, 2023 4:52 pm 
Hero Member
Hero Member

Joined: Sat Oct 24, 2009 7:16 pm
Posts: 1462
Images: 0
Location: USA
Nicely done!
Cubes


Top
 Profile Personal album  
 
Andrew
 Post subject: Re: Plans 491 Build
PostPosted: Sat Mar 11, 2023 9:36 pm 
Newbie
Newbie

Joined: Sun May 15, 2022 8:28 pm
Posts: 38
Made it back to the hangar this morning. I cut a piece of metal, bent it into an arch, and installed it in the tunnel to reinforce it against when it becomes used as a step.

We temporarily put the engine mount into place to see how things look. I could really use some help here. As can be seen in the photos, we have conical rubber mounts that go in the engine case holes. In the 479 drawing, the J-7401-3 Lord mount (or equivalent) is called out. But I cannot find any listing for that anywhere, nor can I find dimensions listed for engine mounts to know which are compatible. Barry mount 94011-20 seems to be a cross-reference, but I really don't want to go buying different mounts hoping they fit. What is the recommended sandwich mount to go in the 478 ring?

Image

Image

Image

Image


Top
 Profile  
 
bfinney
 Post subject: Re: Plans 491 Build
PostPosted: Sun Mar 12, 2023 1:49 am 
Sr. Member
Sr. Member
User avatar

Joined: Thu Oct 22, 2009 2:24 pm
Posts: 504
Images: 6
Location: Yelm, WA USA
According to my notes I replaced my mounts with the Aircraft Spruce Sandwich Mounts for Home Built Aircraft #08-03500. This is a kit of 4 mounts and equivalent to Lord J-7402-1 mounts. I also have a note that Barry 94150-40 are also equivalent.

_________________
Bruce Finney
N18JF T-18C #262
Yelm, WA USA


Top
 Profile Personal album  
 
Andrew
 Post subject: Re: Plans 491 Build
PostPosted: Fri Mar 24, 2023 9:29 pm 
Newbie
Newbie

Joined: Sun May 15, 2022 8:28 pm
Posts: 38
Had a local machinist put a flat spot on the end of the tail spring rod so that we could fit it up and see where to drill the holes for the other bracket. Spent a lot of the session working on removing the existing tail-wheel and spring and fitting up the new tail rod to see where the aft support hole needs to go. As can been seen in the photo, the new spring does move the tail-wheel back about ten inches, which should help with ground handling.
We also began fabricating the two links from the trim control arms to the stabilator trim tabs.

Image

Image


Top
 Profile  
 
James Grahn
 Post subject: Re: Plans 491 Build
PostPosted: Sat Mar 25, 2023 7:18 pm 
Hero Member
Hero Member

Joined: Sat Oct 24, 2009 7:16 pm
Posts: 1462
Images: 0
Location: USA
I want to make sure you have the drawings for that install..
There should be one front hole that has a thick washer. The one hole running wingtip to wingtip. The a collar that uses the two aft holes.
Cubes


Top
 Profile Personal album  
 
Andrew
 Post subject: Re: Plans 491 Build
PostPosted: Sun Mar 26, 2023 1:11 pm 
Newbie
Newbie

Joined: Sun May 15, 2022 8:28 pm
Posts: 38
I do indeed have the tail spring drawing, and the large washer, and the collar.

That was a quick photo I took while showing the kids how much more moment arm the new setup offers.
I’m still drilling the collar bolt hole and the hole for the tail wheel itself.


Top
 Profile  
 
Andrew
 Post subject: Re: Plans 491 Build
PostPosted: Sat May 13, 2023 9:49 pm 
Newbie
Newbie

Joined: Sun May 15, 2022 8:28 pm
Posts: 38
Been a while since I checked in, but I have been making progress. I do what I can at home, like fabricating the aft access doubler plates, and then fit them up to match-drill and install during the Saturday build sessions. I bought a 3/32" countersink bit at SnF, and as soon as I can find it, I'll install the access cover nutplates.
I know that it is part of the plans for the rudder cable slots, but it is still unsettling to cut holes in a perfectly good fuselage. Also, my fuselage apparently sustained quite a dent at some point. I don't know if it has been there all along, or happened during the divorce, or more recently, but regardless, I decided to do a bit of a "dime-and-dollar" patch.

Image

Image

Image

Image


Top
 Profile  
 
Andrew
 Post subject: Re: Plans 491 Build
PostPosted: Sat May 20, 2023 10:03 pm 
Newbie
Newbie

Joined: Sun May 15, 2022 8:28 pm
Posts: 38
The kids and I got the access panel doublers riveted into place today. I also fitted up the mycarta rub strips for the rudder cable slots.
I went ahead and painted the doublers, (1) so that when I do paint the airplane, the little bit of overspray around the cover plates won't be noticeable, and (2) because the white paint on the back looks sharp with the nutplates.


Image

Image


Top
 Profile  
 
Andrew
 Post subject: Re: Plans 491 Build
PostPosted: Sat Jul 08, 2023 11:00 pm 
Newbie
Newbie

Joined: Sun May 15, 2022 8:28 pm
Posts: 38
Not much time for posts lately, but I've been busy both at the hangar and with the smaller stuff at home.
Here's a pic of the right wingtip trimmed and fitted up. Wingtips are from Cubes and fit nicely.
My project came with a mold for the aileron counterweights and the kids and I poured the right hand c'weight this morning.
The initial builder of the project had the turtledeck panels all complete, but they weren't fitting correctly after all the aft bulkheads were riveted into place, so we had to remake them. We completed most of the backdrilling today, and I'll have the kids deburr and dimple next week. Progress!

Image

Image
Image


Top
 Profile  
 
Andrew
 Post subject: Re: Plans 491 Build
PostPosted: Tue Nov 07, 2023 9:44 pm 
Newbie
Newbie

Joined: Sun May 15, 2022 8:28 pm
Posts: 38
I've been busy building and haven't spent much time posting, other than the engine questions.

Over the last few days I've been painting and thought I'd share some pics of Cubes' wingtips, with the mounting plates faired in for the lights.


Image


Top
 Profile  
 
Display posts from previous:  Sort by  
Post new topic Reply to topic  [ 28 posts ]  Go to page Previous  1, 2

All times are UTC - 6 hours [ DST ]


Who is online

Users browsing this forum: No registered users and 8 guests


You cannot post new topics in this forum
You cannot reply to topics in this forum
You cannot edit your posts in this forum
You cannot delete your posts in this forum
You cannot post attachments in this forum

Search for:
Jump to:  

[ Time : 0.108s | 11 Queries | GZIP : On ]