Thorp Air Command - T18.net

Supporting Owners, Builders and Pilots of the Thorp T-18 and its variants.
It is currently Sun May 12, 2024 9:44 pm

All times are UTC - 6 hours [ DST ]


Post new topic Reply to topic  [ 26 posts ]  Go to page 1, 2  Next
Author Message
cgifly2
 Post subject: Skeets T-18
PostPosted: Tue Dec 20, 2011 1:15 am 
Newbie
Newbie

Joined: Tue Sep 13, 2011 7:15 pm
Posts: 41
Location: USA
Ok going to chronicle all the stuff I am doing with pics. Here are the pics of removal of the Rat Ray cowl sidings top tank cowl skin. Planning on doing the firewall will send pics when its removed.
Image
thorp 006 by cgifly2, on Flickr
Image
thorp 005 by cgifly2, on Flickr
Image
thorp 004 by cgifly2, on Flickr
Image
thorp 001 by cgifly2, on Flickr
Just the start! :'(


Top
 Profile  
 
Rich Brazell
 Post subject: Re: Skeets T-18
PostPosted: Tue Dec 20, 2011 11:15 pm 
Hero Member
Hero Member

Joined: Wed Oct 21, 2009 12:33 pm
Posts: 3095
Images: 64
Location: Jamul, CA (San Diego area)
Interesting buss bar/fuse system on the left side. :o I believe that could use an upgrade also ? Just me thinking outloud. ::)

RB


Top
 Profile Personal album  
 
cgifly2
 Post subject: Re: Skeets T-18
PostPosted: Wed Dec 21, 2011 1:33 am 
Newbie
Newbie

Joined: Tue Sep 13, 2011 7:15 pm
Posts: 41
Location: USA
Yeah it wasn't even being used!


Top
 Profile  
 
cgifly2
 Post subject: Re: Skeets T-18
PostPosted: Sun Jan 08, 2012 12:39 am 
Newbie
Newbie

Joined: Tue Sep 13, 2011 7:15 pm
Posts: 41
Location: USA
So I got the firewall off yesterday. And with every rivet drilled I was more and more convinced with my decision. As you can see with the pics I am glad to replace it. Made me think how careful you need to be when buying a used plane from an unknown source. So my philosophy that I developed while building my Hummelbird holds true. " No matter how little you work on the project every day and the laws of physics dictate you will finish one day!"
Image
thorp firewall (5) by cgifly2, on Flickr
Image
thorp firewall (1) by cgifly2, on Flickr
Image
thorp firewall (9) by cgifly2, on Flickr
Image
thorp firewall (6) by cgifly2, on Flickr


Top
 Profile  
 
dickwolff
 Post subject: Re: Skeets T-18
PostPosted: Sun Jan 08, 2012 1:02 pm 
Sr. Member
Sr. Member

Joined: Tue Nov 24, 2009 7:40 pm
Posts: 499
Images: 6
Location: Canada
Nice pics, Skeet. Very inspiring.

BTW, your philosophy that "working every day on the project will eventually result in it being finished" only holds true if you are putting it together, not taking it apart. ;-)

Don't ask me how I know that.


Top
 Profile Personal album  
 
Rich Brazell
 Post subject: Re: Skeets T-18
PostPosted: Sun Jan 08, 2012 5:36 pm 
Hero Member
Hero Member

Joined: Wed Oct 21, 2009 12:33 pm
Posts: 3095
Images: 64
Location: Jamul, CA (San Diego area)
The pics are more than inspiring ! ^-^ 
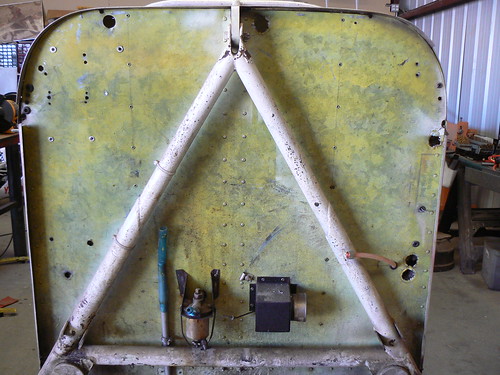
They show a great deal of determination to get the job done ! When you get that "new" firewall installed it will provide even more motivation to get ur done ! Having not been on the receiving end of a major repair/rebuild like yours (hopefully not for a long, long time !), I salute you ! ;)

RB


Top
 Profile Personal album  
 
cgifly2
 Post subject: Re: Skeets T-18
PostPosted: Tue Feb 07, 2012 9:31 pm 
Newbie
Newbie

Joined: Tue Sep 13, 2011 7:15 pm
Posts: 41
Location: USA
OK update and need some help. Acquired A new roll bar as I didn't want to use the old holes for the new windshield. Plus didn't want to be tied in any way to new installation and old parts. Sent the bent landing gear off, got it sandblasted, then set about straightening it. Came out perfect and as mentioned before by someone. I cold bent it on a 22 ton press and it took every bit of 20 tons to do it. SO sent all the parts to powder coat IE roll bar, landing gear, engine mount and lower throttle bracket. SO on to the next job. Oh and if you saw in the first pic there was one of those generic Naca duct scoops on the lower L/S panel. It was actually covered by the fiberglass portion of the Rattray cowling. Well I intend to make the fuselage side of that cowling out of metal top and bottom with no piece in between so I didn't want that to be showing so made a patch, which in turn got my riveting skills warmed back up.
Now for the help. When I purchased 7077J I received a partial set of plans. I have everything on the gas tank EXCEPT the gas tank. I already have a set of end caps for the tank and only need to bend up the sheet to match. I don't know what material call out is or more importantly the exact width of the tank. The fiberglass tank that was in there before is not much help as it was to small. It only held 26 gallons and I certainly want to correct that now. So anybody got some measurements for me would be a great big help.


Top
 Profile  
 
dickwolff
 Post subject: Re: Skeets T-18
PostPosted: Tue Feb 07, 2012 9:49 pm 
Sr. Member
Sr. Member

Joined: Tue Nov 24, 2009 7:40 pm
Posts: 499
Images: 6
Location: Canada
I recommend epoxy on the gear and the mount. Powder coat is thick and flexible which could hide cracks.


Top
 Profile Personal album  
 
Rich Brazell
 Post subject: Re: Skeets T-18
PostPosted: Tue Feb 07, 2012 10:26 pm 
Hero Member
Hero Member

Joined: Wed Oct 21, 2009 12:33 pm
Posts: 3095
Images: 64
Location: Jamul, CA (San Diego area)
Concur on the landing gear and the engine mount with regard to powder coating. A good primer and a couple of coats of industrial paint. You really want to see any "cracks" that might show up and the "thick" powder coating might mask that. JMHO. I can look tomorrow with regard to the tank numbers. It's almost my bedtime in San Diego. You are in Apple Valley... ?

RB


Top
 Profile Personal album  
 
cgifly2
 Post subject: Re: Skeets T-18
PostPosted: Tue Feb 07, 2012 11:34 pm 
Newbie
Newbie

Joined: Tue Sep 13, 2011 7:15 pm
Posts: 41
Location: USA
Yes Apple Valley same time zone! Late nighter though. Look forward to those numbers thanks and for other opinions. Have heard the crack under the powder coating before. And while I respect all opinions and welcome them I am not sold on that as a problem for me. Being very hands on and always taking my stuff down a fiddling. I believe while it MAY crack under with out detection I dont think it would or could get to the point of failure before I would catch it. I would rather have the durability and one time (hopefully) coating on it. I have LOTS of experience with it on race bikes and they get a pounding (vibration wise and crashes) and have never seen a problem. Some of the epoxy based paints (that I have used ) are capable of the same hidden damage, to a lesser degree of course. Again thanks for all your concerns.
SKeet


Top
 Profile  
 
cgifly2
 Post subject: Re: Skeets T-18
PostPosted: Wed Mar 14, 2012 12:27 am 
Newbie
Newbie

Joined: Tue Sep 13, 2011 7:15 pm
Posts: 41
Location: USA
Ok Time for an update and a question. Got the tank tack ( little bit more than tack) welded together and went to do a trail fit. It doesn't fit perfectly in the saddle. Could be 1 I wrapped the skin around the outside of the sides, 2 They just don't come out perfect. You can see how I did it in the pics. The description goes like this. Laid out the metal flat and marked all the lines. Then cut it out. Rolled the 3 separate radius in my roller. At that point it looked real good. Then cut out 2 pieces of wood with the exact shape of the ends. I then put the female pieces around the metal towards the center. I then put the male pieces on the ends and slid the female pieces toward the ends tightening up the skins. This is where I made my 1st mistake. I thought on a cold winter night I would be able to just tack several spots on the long across seam WRONG. The adjacent skin just warped unbelievably. It wasn't terrible unusable but not pretty. So then I popped out the side pieces and shoved the end caps inside the skin and clecoed in place as I went. SO before I welded the sides on I stuck it in the back of my Subaru wagon all day and took it out to weld. It was just fine as the hole tank was now very warm.
So the question as you can see it doesn't quite fit in the saddle. I am sure mine can not be the only exception. What are your suggestions? Custom Saddles? Manipulate whats there. IE convince the saddles or the tank they must work together with a pep talk and a hammer?
Image
layout 2 by cgifly2, on Flickr
Image
exact fit 2 by cgifly2, on Flickr
Image
final roll 1 by cgifly2, on Flickr
Image
ready to weld by cgifly2, on Flickr
Image
finished roll 1 by cgifly2, on Flickr
Image
left side fit by cgifly2, on Flickr
Image
right side fit by cgifly2, on Flickr
Image
tank top by cgifly2, on Flickr


Top
 Profile  
 
Lou
 Post subject: Re: Skeets T-18
PostPosted: Wed Mar 14, 2012 1:23 am 
Sr. Member
Sr. Member
User avatar

Joined: Sun Feb 12, 2012 4:04 pm
Posts: 375
Images: 3
Location: San Bernadino, CA
Well I don

_________________
http://www.dixiefriedfabrication.com/


Top
 Profile Personal album  
 
cgifly2
 Post subject: Re: Skeets T-18
PostPosted: Wed Mar 14, 2012 8:29 am 
Newbie
Newbie

Joined: Tue Sep 13, 2011 7:15 pm
Posts: 41
Location: USA
Yeah well new tank is NOT an option. Thats why the question looking for what some others have done. Your welcome by anytime!


Top
 Profile  
 
Rich Brazell
 Post subject: Re: Skeets T-18
PostPosted: Wed Mar 14, 2012 8:36 am 
Hero Member
Hero Member

Joined: Wed Oct 21, 2009 12:33 pm
Posts: 3095
Images: 64
Location: Jamul, CA (San Diego area)
I got my tank from Classic Sport Aircraft. It did not fit exactly into the saddles either. ??? 
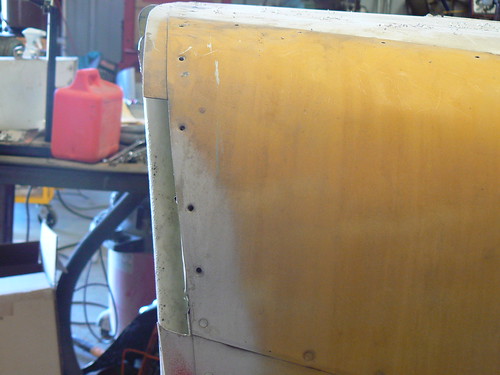
I did have to persuade it a bit with a small hammer in a few places to make it fit into the saddles. :P I see you have the tank in the saddles w/o the rubber (or in my case cork) chafe strips... Not sure if you can make a tank out of the required material that will fit "perfectly ?" :o You do have an advantage over me as your skin is off in that area and you can really see what's going on. I did not have that option.

RB


Top
 Profile Personal album  
 
cgifly2
 Post subject: Re: Skeets T-18
PostPosted: Wed Mar 14, 2012 8:45 am 
Newbie
Newbie

Joined: Tue Sep 13, 2011 7:15 pm
Posts: 41
Location: USA
I kind a figured that was the case. And yeah that's why I am doing this before the skin. I am thinking about cutting out the "saddle" portion of the brackets and just riveting onto the existing brackets a new saddle portion with lots of room. But will wait to see other ideas 1st.


Top
 Profile  
 
Display posts from previous:  Sort by  
Post new topic Reply to topic  [ 26 posts ]  Go to page 1, 2  Next

All times are UTC - 6 hours [ DST ]


Who is online

Users browsing this forum: No registered users and 7 guests


You cannot post new topics in this forum
You cannot reply to topics in this forum
You cannot edit your posts in this forum
You cannot delete your posts in this forum
You cannot post attachments in this forum

Search for:
Jump to:  

[ Time : 0.094s | 12 Queries | GZIP : On ]